Sliding doors, with their sleek design and functional elegance, are a popular feature in many UK homes, particularly as patio doors. However, like any home feature, they may require replacement due to wear and tear, style upgrades, or for better insulation. This guide provides a step-by-step approach to replacing sliding doors, highlighting the importance of choosing the right products, like those offered by Fenbro, for optimal performance and aesthetics.
Before you start — gather your tools
To make sure everything goes smoothly, you have to prepare yourself. Namely, get the necessary tools. You’ll need:
- A screwdriver set
- A pry bar or a flat chisel
- A tape measure
- A level
- Safety gloves and goggles
- A helper (some parts of the process require two people)
Step 1 — assessing your needs
Embarking on the journey of replacing your sliding doors begins with a critical assessment of your specific needs, ensuring that your new doors not only meet but exceed your expectations. This first step is about envisioning the ideal functionality and aesthetic appeal that the new doors will bring to your home.
Evaluating threshold height
Start by considering the threshold height. Do you require a low, flush threshold for barrier-free access, perhaps to accommodate wheelchairs or strollers, or to simply create a seamless transition between indoor and outdoor spaces? This choice impacts accessibility and contributes to the overall design flow of your home. Check also level of the floor from the external side of the room and the internal side. Some models of sliding doors have possibility to use flush threshold just from the internal side of the room. The flush threshold has got impact on the price of the patio doors (can increase the price up to 15% depends on the model).
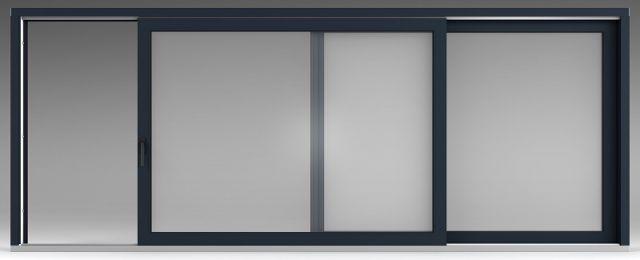
Deciding on the number of panels
Next, think about the number of panels or wings (opening scheme of the door). Are you looking for a wide, unobstructed view with fewer, larger panels, or do you prefer the flexibility and nuanced control over opening that comes with multiple panels? This decision will influence the amount of natural light your space receives and how you interact with your outdoor area. Also, pay attention to the width of the opening (access width) after opening. Important is to focus on the direction of the sliding of the active door leaf. Depends on the model you can have one, two or even three active door leafs. The number of doors leaf have an impact on the number of tracks on which door leafs are sliding.
Selecting the colour scheme
Colour selection is more than just an aesthetic choice; it’s about harmonising with your home’s existing palette and architectural style. Whether you opt for a classic, understated hue that blends seamlessly or a bold, statement colour that stands out, your choice will significantly impact the overall character of your living space. The most popular colours in these days are anthracite (RAL7016) or black RAL9005.
Choosing glazing options
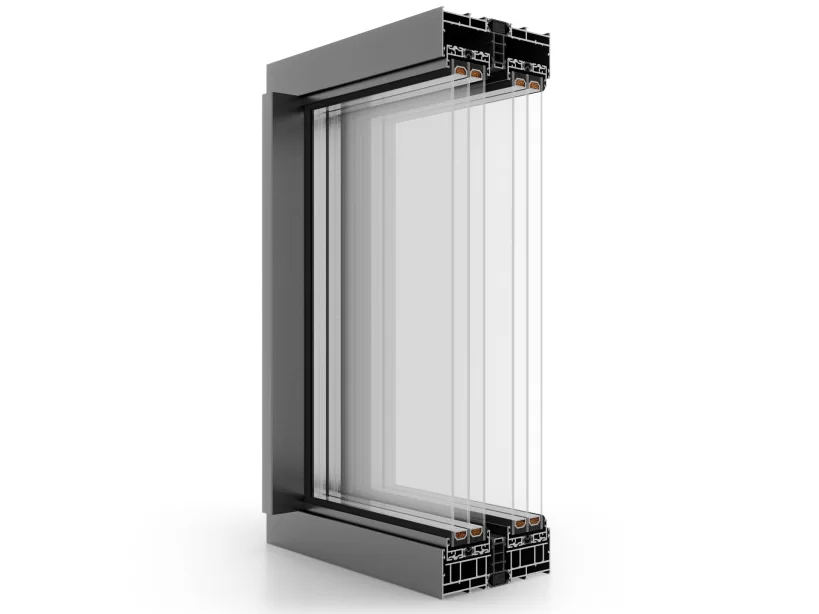
Finally, deliberate between double or triple glazing. This is not just a matter of insulation, although that’s a significant factor, especially in the varied UK climate. It’s also about considering sound insulation, UV protection, and even the potential impact on your energy bills. Double glazing offers substantial thermal and noise insulation, while triple glazing elevates these benefits to a higher level, making it ideal for homes in noisier areas or harsher climates. For a deeper dive into the differences and benefits of double versus triple glazing, visit Fenbro’s comprehensive guide
By thoughtfully navigating these considerations, you lay a solid foundation for your sliding door replacement project. The right choices here will amplify the functionality of your doors and elevate the aesthetic and comfort levels of your home. Fenbro’s range of sliding doors offers various options to cater to these diverse needs, ensuring that your selection is perfectly aligned with both your practical requirements and design aspirations.
Step 2 — choosing the correct material
The size of your sliding door system plays a vital role in material selection. For doors up to 4500 mm in width, uPVC is recommended due to its excellent insulation properties. For widths above 4500 mm, aluminium is preferred for its sturdier construction, capable of supporting the weight and pressure of larger glass panes. Fenbro offers a range of materials to suit various size requirements and aesthetic preferences.
Step 3 — considering structural requirements
When it comes to installing large sliding door systems, it’s imperative to delve into the structural intricacies of your home to ensure a safe and stable installation. This step is not just a precaution but a necessity for the longevity and functionality of your new doors. Depending on the width of the sliding doors it might be necessary to deliver dissembled sliding doors (frame, sashes, glazing unit) and assemble everything on the construction site. That will make it easy to move all parts to the installation area and will ensure compliance of fitting.
Reinforcing for larger systems
Large sliding doors, with their expansive glass and heavy frames, exert significant pressure on the surrounding structure. In such cases, reinforcing critical architectural elements like ceiling joists becomes essential. This reinforcement is designed to bear the additional weight and stress, preventing any potential warping or damage to the integrity of your home. It’s advisable to consult a structural engineer or a professional installer from Fenbro to assess and address these needs accurately. To avoid any damage of sliding doors, it is a good practice for all glazing units to be inserted into sashes after installation of sliding doors in the opening.
Evaluating flooring compatibility for low flush thresholds
The allure of a low flush threshold lies in its sleek, modern appearance and the seamless integration it offers between indoor and outdoor spaces. However, to achieve this elegance, it’s crucial to evaluate your flooring structure. Factors such as screed depth, underlying support, and floor levelness play pivotal roles. A shallow screed may not provide adequate support for the threshold, leading to issues with door operation and waterproofing. Ensure that your flooring can accommodate the specific requirements of a low flush threshold, considering aspects like insulation, moisture barriers, and overall floor strength. In the threshold, there are drainage holes (responsible for releasing water during the rain). It is important to ensure that those holes are not blocked.
Professional insight and assistance
Given the complexities involved, enlisting the help of professionals is highly recommended. Specialists from Fenbro can provide valuable insights into the specific structural requirements of their sliding door systems. Their expertise ensures that your installation meets the current building standards and aligns with the best practices for safety and durability. Learn more about Fenbro’s professional installation services and their approach to meeting structural requirements.
Addressing these structural requirements with diligence and foresight sets the stage for a sliding door installation that is not only aesthetically pleasing but also robust and enduring. It’s about creating a seamless transition in your home that stands the test of time, both structurally and stylistically.
Step 4 — removal of the old sliding door
Carefully dismantle and remove your old sliding door. Start by taking off the door from the track, followed by unscrewing the frame from the wall. Be cautious with the glass. If you’re inexperienced with such tasks, consider seeking professional help. Here’s how it should be performed:
- First, remove the sliding panel. Lift it up into the top track and angle the bottom out towards you. Gently set it aside in a safe place.
- Next, remove the stationary panel. Unscrew any fasteners holding it in place and carefully lift it out similarly.
- With the panels out, unscrew and remove the door frame. Use the pry bar if the frame is stuck due to paint or caulking.
Step 5 — preparing the space for the new sliding door
Once the old door is removed, clean the area thoroughly. Check for any damages or irregularities in the space that might affect the new installation. Make sure the area is level and ready for the new door. Here’s your checklist to complete this step:
- Clean the doorway area thoroughly, removing any debris, old caulk, or protruding nails.
- Check the sill for level and the sides for plumb. This step is crucial for the proper operation of your new door.
Step 6 — installing the new sliding door
Carefully unpack your new Fenbro sliding door, ensuring all components are present. If your door width exceeds 2000 mm, remember that Fenbro requires customers to unload all pallets. Follow the installation process. This usually involves placing the new door in the opening, ensuring its level, and then securing it in place. How to do it right? See the list below:
- Start by installing the new door frame. Carefully lift it into place and use shims to ensure it is level and plumb.
- Once the frame is secured, install the stationary panel first, then the sliding panel. Check if they fit and slide easily.
- Screw the frame into the wall, but don’t over tighten – this might warp the frame.
Step 7 — finishing touches
Once installed, check the door’s operation. Adjust the rollers and locks as necessary to ensure smooth movement and secure locking. Seal any gaps between the door frame and wall to enhance insulation. Checklist:
- Test the door several times to ensure smooth operation. Adjust the rollers at the bottom if needed.
- Look for gaps between the door frame and the wall and seal them if you find any.
- Install the lock and handle according to the manufacturer’s instructions.
Step 8 — disposal of the old door
Dispose of your old door responsibly. Consider recycling parts where possible, especially glass and metal components.
Conclusion
In wrapping up, it’s important to clarify that the insights shared in this article are not meant to serve as a comprehensive guide for installation, but rather as essential highlights for setting up a sliding system. Undertaking such a pivotal task as installing a sliding system demands the expertise of a professional. While Fenbro does not provide installation services directly, we can recommend trusted, independent installers who are familiar with our products and experienced in sliding door systems. By working with such professionals, you can ensure that your project is completed to a high standard — from the initial assessment to the final touches.
Choosing a recommended installation partner helps maximise the aesthetic and functional benefits of your new doors, including improved insulation, enhanced security, and increased property value. With the right guidance and products from Fenbro, you can enjoy a smooth and satisfying upgrade that elevates your home.